How do I submit a support ticket online?
Introduction
The purpose of this article is to illustrate how someone can submit a ticket to the RMS Support Desk. It is a simple process that consists of just a few steps. Once you have submitted the ticket we will generally exchange emails back and forth until the issue is resolved. Sometimes if an issue is too complex for emails we will respond with a phone call. You should either print this article or duplicate this new tab in your browser as following the steps below will take you away from this page.
Advantages of Registering
The RMS Support Desk allows users to register themselves. Users who become registered have the following benefits:
- They may view all of the support tickets that they have submitted, including our responses.
- When submitting a ticket they do not have to reenter their name or email address.
- Since your phone number is saved in your account we can easily call you when needed.
- If their organization has multiple QCS users they can view tickets that were submitted by other users in their organization.
- If the problem reoccurs a registered user may reopen the ticket. Reopened tickets receive priority support.
- Once the issue has been resolved you may close the ticket online.
Registering with RMS Support Desk should not take more than a couple of minutes and you will appreciate the benefits.
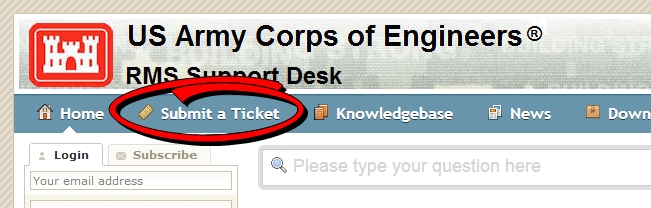
Step 1: Opening the submit a ticket form
The first step in submitting a ticket is to click on the link "Submit a Ticket" in the toolbar as shown in the screen shot below.
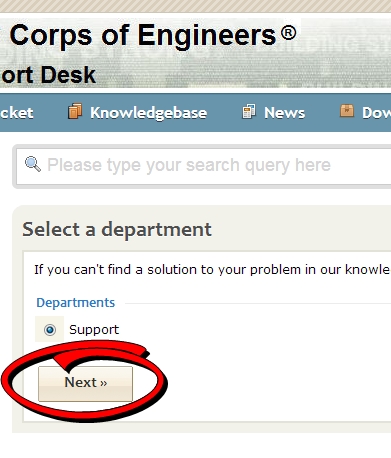
Step 2: Selecting a department
The first prompt is to select the department you wish to submit the ticket to. Currently we have only one department, Support, as shown in the screen shot below so you will only need to click on the [Next >>] to go to the next step.
Step 3: Entering ticket details
The next step in submitting a ticket will be to enter all of the information necessary so that we do not need to ask you for additional information. The screen shot below shows the fields highlighted in yellow.

Each of the fields are described here:
- District: If you know the USACE district you are in select it from the drop down. We use this information in adjusting callbacks depending on timezone.
- Contract ID: This is very important. If your ticket is related to information that is part of a particular contract we will be asking for the ID of the contract. Entering it here will help us in solving your problem more efficiently. Remember that your contract ID is a letter followed by seven digits with NO spaces and dashes.
- Site ID: This also is very important. Enter the site ID of the site that is having problems here. If multiple sites are having problems enter the site ID of the master site.
- Subject: This is the title of the ticket.
- Message: Enter the problem here. Note that Support Desk will attempt to find an article that is related to your question. Please review the suggestions provided as your answer may be found there.
If you are not logged into RMS Support Desk you will also be asked for your Full Name and Email.
Step 4: Attaching files or a screen shot
You can attach a file to your ticket. If you are getting an error message it is much better to send us a screen shot rather than just typing the error in the message area of the ticket. With the screen shot we have the exact message and the module where the error occurred in. You can do this by tapping the "PrtScn" key on your keyboard when the error message is displayed and then opening Microsoft Word and selecting "Edit | Paste" from the menus. Save the document and attach it to your ticket. Other files that we ask for as SDEF text files or reports exported to PDF format.
To attach a file to your ticket you will need to click on the link [+ Add File] below the message box as shown in the screen shot below:
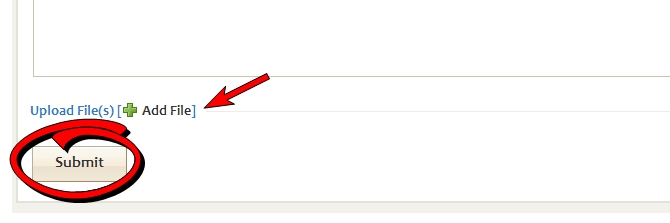
Step 5: Submitting your ticket
After you have completed entering data in each of the fields specified in Step 3 and attaching files as shown in Step 5 you are ready to submit the ticket. You can submit the ticket by clicking on the [Submit] button in the lower left corner of the web page.
Remember that if you have already logged into RMS Support Desk your ticket will also be linked to your phone number. This will reduce the time needed to resolve your ticket as we will not have to ask you to provide your phone number.